
Overview and Tech Requirements #
Respondus has two tools used for D2L/Brightspace Quiz security: the LockDown Browser which prevents users from accessing resources outside of a Quiz, and Respondus Monitor which records the student as they take a quiz, thus deterring behaviors associated with cheating. Here’s a video that explains each tool:
Tech Requirements #
Students must have the following to use LockDown Browser:
- Windows: 11 and 10
- Mac: macOS 10.15 to 14.0+
- iOS: 12.0+ (iPad only).
- Ability to install applications
Students must have the following to use Respondus Monitor:
- Windows: 11 and 10
- Mac: macOS 10.13 to 14.0+
- iOS: 12.0+ (iPad only).
- Web camera (internal or external) & microphone
- A broadband internet connection
Quick Start Guides #
- Student Quick Start Guide to LockDown Browser and Monitor
- Instructor Quick Start Guide to LockDown Browser and Monitor
Create the Quiz in D2L #
To begin, create a quiz in D2L. Creating the quiz in D2L is identical whether you choose use LockDown Browser and/or Monitor or not. Here’s some tutorials that can help you create a Quiz in D2L:
Turn on LockDown Browser and/or Monitor from Tab #
With your Quiz created, you can now turn on LockDown Browser and/or Monitor.
- To get started, go to the Quizzes area of your course, and then select the tab called LockDown Browser.
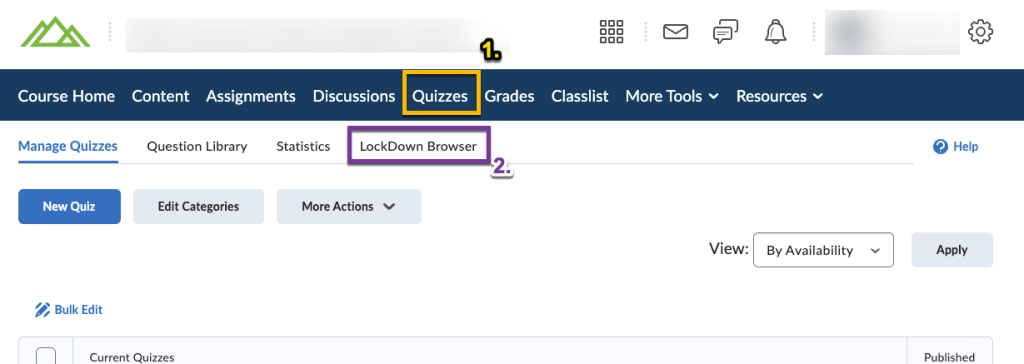
- You should see the Respondus LockDown Browser Dashboard. The dashboard allows you to see and edit the LockDown Browser/Monitor settings for any quiz in your course.

- To edit the settings for a quiz, click on the down arrow next to a quiz and select ‘Settings‘.

- The LockDown Browser and Monitor settings for the quiz will expand. To require LockDown Browser and/or Monitor for a quiz, simply click on the option titled, ‘Require Respondus LockDown Browser for this exam‘ or ‘Require Respondus Monitor for this exam‘. Note that you will have to first enable the LockDown Browser in order to require Respondus Monitor. Respondus Monitor also has an option for live proctoring via Zoom or Teams if you have students take their exams during a specific time window.
If you click on the green “Questions?” button, you can schedule a 15-minute session with a Respondus trainer to get help setting up any of their products.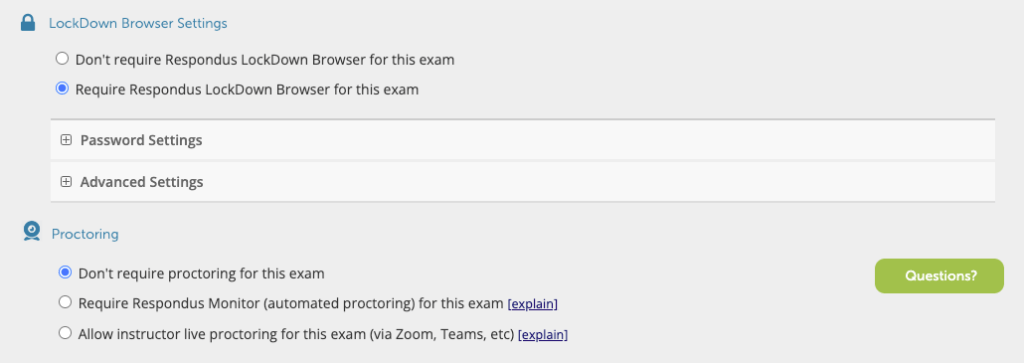
- When turning on Respondus LockDown Browser and/or Monitor for a quiz, you will be presented with a wealth of various options which will be covered in detail below. Once you are done configuring the settings for your quiz, click on Save and Close to finish.

Settings for Respondus LockDown Browser #
Click on Advanced Settings to expand the menu. You can also click on the explain link next to each setting to get a description of what each one does.

Password Settings #
- Password to access exam – This setting would require the student to type in a password to access the exam. eLearning recommends only using this feature in a face-to-face proctored setting.
Advanced Settings #
- Require LockDown Browser to view post-exam feedback and results – If feedback and results are displayed after the exam, this option will require students to use the LockDown Browser to view them. If you also use Respondus monitor, the video recording will end when students submit the exam but will not record them when reviewing results or feedback.
- Lock students into the browser until exam is completed – eLearning doesn’t recommend using this setting, as it requires students to type in a password to exit the exam. This setting would only work in a proctored environment.
- Allow students to take this exam with an iPad – This option allows students to use the ‘LockDown Browser app‘ from the Apple appstore to take the exam.
- Allow access to specific external web domains – This option allows you to add any URLs of sites that students could visit to assist with their exam, i.e., you could place a link to an article that students would need to analyze during a written exam.
- Enable Calculator on the Toolbar – You can allow a standard or scientific calculator to be available to students within the LockDown Browser.
- Enable Printing from the Toolbar – This enables printing during the exam; keep in mind that this could allow students the ability to print the exam.
Settings for Respondus Monitor #

Startup Sequence #
You can choose which parts of the Startup Sequence to include in the first section of the Respondus Monitor settings. For example, you could require students to show an ID to verify their identity. In addition, some sections, such as Additional Instructions, allow you to customize the text that appears to students.
You can always click the Preview link next to any option to see how it would appear to students.
Facial Detection Options #
- Prevent students from starting the exam if face cannot be detected during Startup Sequence – This setting will prevent the student from starting an exam, unless their face can be detected.
- Notify students during the exam if face cannot be detected (prompt for a fix) – If a student’s face is no longer detected during an exam (I.E. they moved off camera), then the exam cannot be continued until their face is detected again.
Recording Options #
- Record the screen while the student is taking this exam – If you want to record the student’s screen while they’re taking the exam, you can enable this option. Note that students will already be limited to the LockDown browser and any URL’s specified in the “Allow external domains” setting. Student’s taking the exam on an iPad will not have their screens recorded.
Advanced Settings #
- Allow this exam to additionally be delivered in a proctored lab – use this setting if you will be proctoring this exam live, or if the Testing center will be proctoring the exam. The exam will require students to enter in a password to take the exam. They will be required to use the LockDown Browser, but their webcam will not be recorded. You will need to provide the password to the proctor.
- Enable “Show Your Work” step at end of exam – This option will prompt students to take pictures of any notes taken during the exam after the exam is submitted.
- Allow another application to use the microphone during this exam – If a question in your exam requires students to respond by recording audio, select this option.
When making any changes to the Respondus settings, be sure to click on the “Save and Close” button before exiting.
Taking the Quiz #
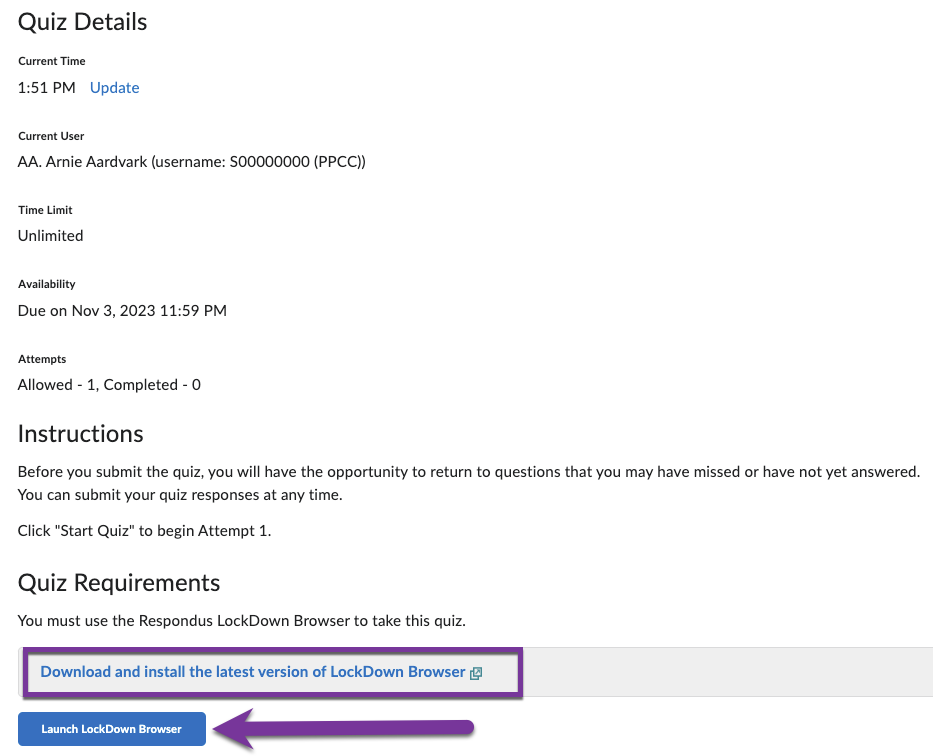
Students will take the Quiz through the Quizzes tab, or if you’ve linked the Quiz in your Content tab. When students open the Quiz, they will have the option to “Download and install the latest version of LockDown Browser” if they’ve never downloaded the LockDown Browser before, or they can “Launch LockDown Browser” to begin the exam.
Review Results #
Once your students have completed the quiz, it’s now time for you to review the results. Go to the Quizzes tool and click on the LockDown Browser tab:
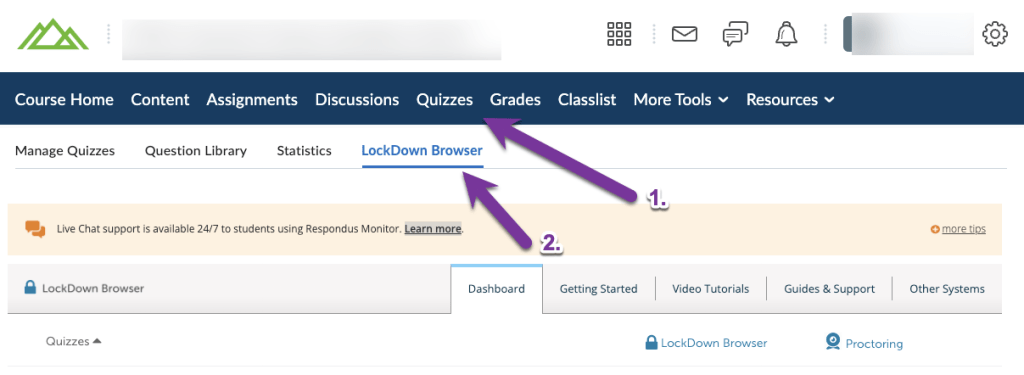
From here, you can click the drop down next to any quiz to see the results.

Settings allows you to adjust the requirements you set up earlier.
Class Results allows you to view how the class did and review for any Priority viewings. By clicking the plus “+” next to a student’s name, you can see details along with a video of the student taking the exam. Exams will automatically be sorted from those with Highest Review Priority, to least review priority. Highest Review Priority means that the webcam may not have been able to detect a student’s face for a period of time.

Exam Stats shows details about how the class is taking the Quiz:

Troubleshooting Issues #
If you run into any issues with Respondus, there are a variety of different resources out there to help.
- Attend a Respondus Webinar to get an overview of how to set up LockDown Browser and Monitor and understand the student experience.
- Submit a ticket to Respondus if you experience any technical issues.
- Schedule a 15-minute meeting with a Respondus trainer to get personalized help setting up any Respondus features.
- Student issues can be addressed via live chat with Respondus from within the LockDown Browser. They can also submit a ticket to Respondus at any time.
- Reach out to us at elearning@pikespeak.edu and we’ll be happy to help!


You must be logged in to post a comment.